The Anatomy of a Checklist
Let's have a look at our Tutorial Checklist (which is simply a tutorial made into a checklist):
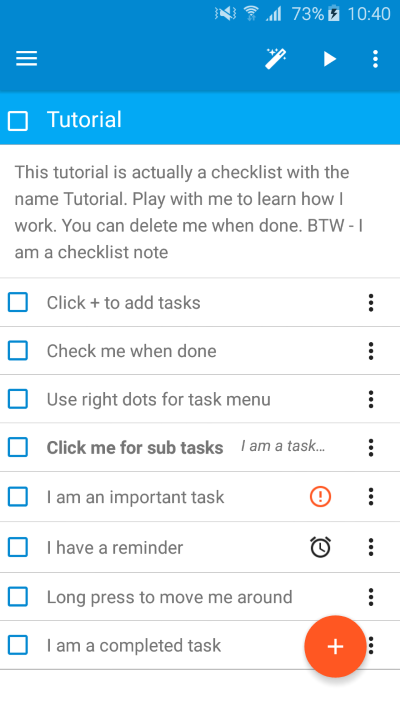
Let's examine the page from top to bottom:
The Toolbar
The Hamburger icon
Those three horizontal lines on the top left will open the Dashboard where you can see your checklists and smart lists.Tip: you can also swipe the screen from left to right to bring up the Dashboard.
Checklist Menu
On the top right you will find the checklist menu (the three vertical dots) as well as buttons linking to the Wizard and the Checklist Player. Opening the menu will give you many options. Each will be performed on the checklist (or sub-task if you are in one).Checklist (or task) name.
In the example above the checklist name is "Tutorial". Clicking on the name will allow you to edit the name of the checklist.Clicking on the checkbox will check (or un-check) the entire list.
Checklist notes.
The checklist notes are optional. You will only see the notes section if you have entered any. You can do so from the Checklist menu at the top right. To edit an existing note, click on the notes or select Notes from the checklist menu.The Tasks
Here you will find the tasks belonging to this checklist. You can have as many tasks as you like. Each task will have (from left to right):- Checkbox. You can check completed tasks. This will also check any sub tasks this task may have. Checking again will reverse and mark the task as incomplete (open).
- Task name. Tasks that have sub-tasks will be in "bold". Clicking on the task name will open its page and allow you to treat it as if it was a checklist. Think of this as a hierarchical structure.
- Task notes (Optional). Any notes you have added to this task will be shown. Tip: If you have a long task name and/ or notes and you cannot view them in full, simply click on the task to view it in full
- Task icons (Optional). If the task is shared, marked as important, has a reminder or an attachment: an icon will be shown to denote each option. Clicking on the Important icon will remove the importance. Clicking on the Reminder will open the reminder popup and clicking on the assigned icon (in case the checklist is shared) will open the Assign popup and allow you to assign the task to a team member.
- Task menu (the three vertical lines). The task menu allows you to perform actions on the specific task. The menu is similar to the Checklist menu.
- Swipe. If you swipe the task (left or right), it will be deleted. You have a toast notification shown at the bottom of the screen confirming the deletion and allowing you to undo.
- Drag and drop (DnD). Long pressing a task allows you to drag it up or down the list in order to re-arrange the list. Note: DnD is disabled for sorted lists and when showing subtasks.
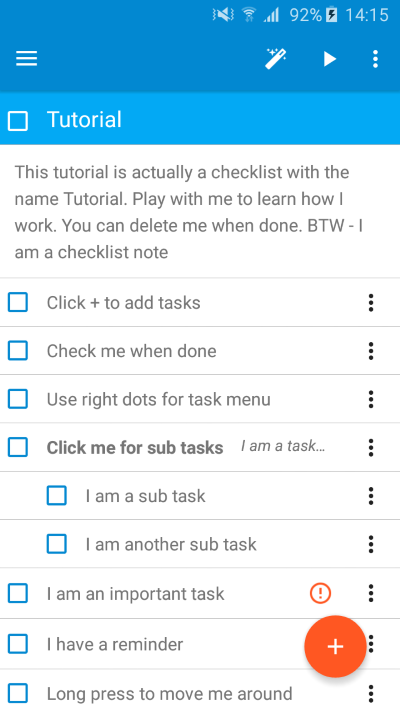
Note how there are two sub tasks under the "Click me for sub tasks".