Scheduling Templates
Scheduling Templates
Checklist templates can be scheduled to triggered once or repeatedly (on a regular basis) in the future. For our hotel example you can think of "Daily rooms cleaning" or a "Weekly pricing update".
Once you have created your template is it easy to schedule a run. Since the template schedule is part of the template editing process, only an Editor can create or delete a schedule.
Creating a Schedule
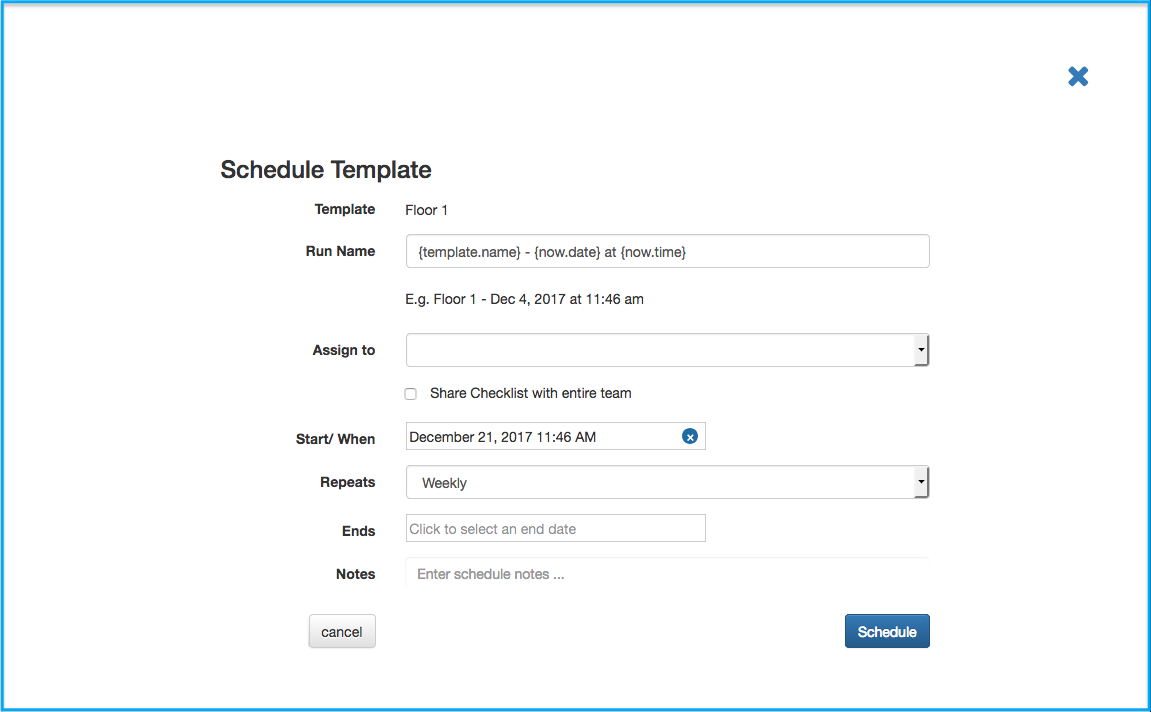
To create a schedule, open the Template Editor for the template you wish to schedule. Click on the template name in the middle column to view the template settings pan on the left. Click on the +Schedule button to open the Schedule Template popup will open:

The Schedule Popup
The Schedule popup let's you update the schedule settings:
- Run Name. As the template will be run in the future multiple times, you may wish to give it a name based on the template name and the date/time it will actually be triggered. Anything in the curly brackets will be dynamically updated at run time. You can see an example name as you make changes to the name.
- Assign to (optional). Let's you assign the whole checklist (rather than individual tasks) to a team member.
- Share Checklist with entire team. Check this option if you wish the entire team to have access to this checklist and be able to work on it.
- Start/ When. This is the schedule date/time for the first run of this schedule and is required.
- Repeats. You can schedule a template run once or have it repeated regularly. See below for more details on repeat schedules
- Ends. This is optional and will only show if you have selected a repeating schedule. If specified, the schedule will be terminated at this date and time and no further triggering will take place.
- Notes. Here you can add (or customize the template's) notes for people working on the checklist. These notes will show at the top of the checklist to anyone working on it.
Repeating Schedules
You can set the following repeat options:
- Daily. A new checklist will be created daily at the start time set
- Weekly. A new checklist will be created daily on the same day as the start date. If you want more than one day, simply add multiple schedules each with a different start day
- Monthly. A new checklist will be created monthly on the same day of the month as the start date
- Annually. A new checklist will be created annually on the same day and month as the start date
The Date Time Picker
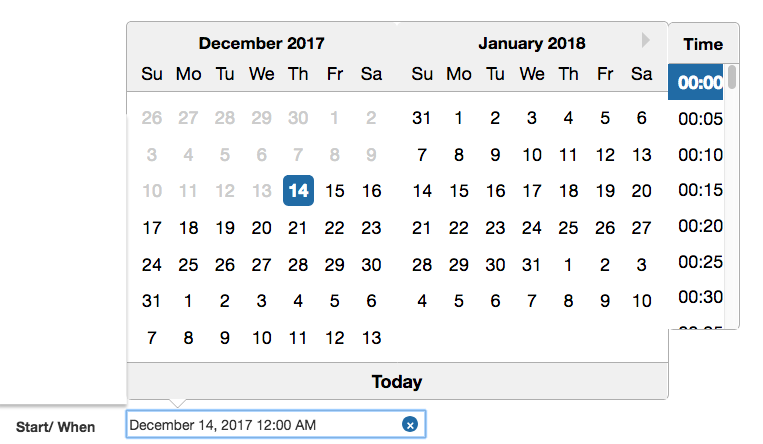
The Date Time Picker is used to set the start and optional end time for the schedule. Click on the Start/ Ends text box and the picker will be opened. You should first select the date and then scroll the time picker on the right to select the desired time.
If you need to make a change, simply click on the text box with the date. Click on the blue X icon to clear your selection.

Current Schedules
Clicking on the Current Schedule in the Template Editor will let you view the current schedule. Read more about viewing current template schedules
Read next: Viewing Running Checklists
